

Cardboard Box Oven
This is a glorified Box Oven compared to the one I made as a kid in the scouts.
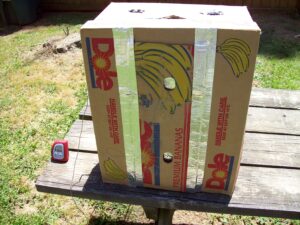
For this project the best box would be a banana box or fruit box because of the heavier thicker corrugated design. This box can be picked up for free at your local grocery store. A printer paper box from work would do the job too. The Box Oven can be completely free or as expensive and high tech as you want. The following items can be purchased for about ten bucks or liberated from somewhere else around the house or garage.
4 – 1/8” Diameter Steel Rod (36” long)
1 – Metal Trivet (Steel or Aluminum)
2 – 8 x 8 aluminum Trays
Roll of Aluminum Foil
Aluminum Duct Sealing Tape (optional)
Digital Thermometer with probe (optional – we’re going high tech)
Super Glue
Most boxes I have used are 20” long by 15” wide x 9-1/2” deep. Turn box up vertical on end. Measure up 9-1/2” up from bottom and strike a level line on both sides of the box. Measure down 4″ from top and strike another level line on both sides of the box. If you do not have a trivet, strike a level line 1” up from bottom.
Mark the top line for two 1/8” holes four inches apart. Mark the middle line for three 1/8” holes three inches apart. Mark the bottom line the same as the top, if you’re not using a trivet. (See Photo)
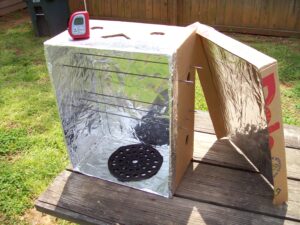
The lid needs to be modified to fit properly. Trim the lip on one end of the lid so it will fit flush on the box without having to handle the box. Use the leftover cardboard to fill the gap in the lid. Use the foil tape to seal off. (See Photo) Remember when baking that the box will be HOT, especially at the top. Caution: Do not use the tape on the inside of the box. The glue on the tape is good for sealing, but not for eating.
Line the inside of the box and lid with two layers of aluminum foil and glue as needed. Be sure and put the shiny side out.
Cut the metal rods in half or have them cut at the home improvement store. Use the rod or an ice pick (be careful) to punch the holes in the box. Brace the box from behind as not to bend or crush it. Also, punch a series on holes on both sides of the box just up from the bottom for ventilation. The handle hole on top can be vented as needed when baking, by taping a foil patch on it as an adjustable flap.
The top and bottom rack will support the aluminum trays and the middle rack with hold the food. (See Photo)
If this oven is going high tech with a hole for the digital probe will be needed. The probe should be as close to the food as possible without touching. Install it about 2” up and near the back of the baking rack.
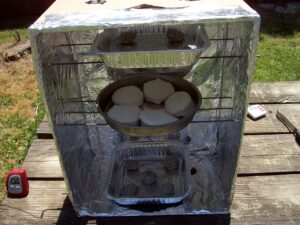
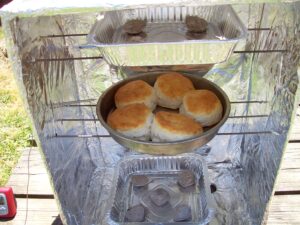
For a test drive we used a tube of store-bought biscuits and baked them as directed. This oven will need nine briquettes, four on top and five on the bottom. When the charcoals are just turning gray, put four, one in each corner of the tray for the top rack and five, one in each corner and one in center for the bottom rack. Put biscuits in Box Oven. Put on Lid and bake.
The temperature will soar up to 400 degrees or so, then slowly drop to about 225 degrees and hold. Check after about ten minutes or so.
Write me and let me know how you did and what you baked. Maybe some improvements made.
Good Luck and Enjoy.
Camp Master